


Suggested reading:
- STM Application Note AN3268
- Tutorial that explain: How to start new project using Free ATOLLIC Lite and STM32 Discovery
- Tutorial that explain: How to use STM32 Library Examples in ATOLLIC TrueSTUDIO Lite and STM32 Discovery
- Atollic Installation Guide
- Atollic Quick Start Guide
- Technical presentation concerning STM32
- MKT presentation concerning STM32
INDEX
Thee are two possibility:
1) Load only an example to compile and debug it. Click here to go to this explanation.
2) Load all the examples and then select one to compile and debug. Click here to go to this explanation.
1) Load only an example to compile and debug it. Click here to go to this explanation.
2) Load all the examples and then select one to compile and debug. Click here to go to this explanation.
Preconditions:
- The PC operating system is Windows XP SP3.
- In the PC is installed the free Atollic software (TrueSTUSIO STM32 Lite 1.4.0).
- For test the example below is used the STM32 Discovery.
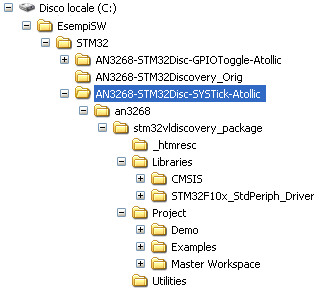
- We use the directory:
C:\EsempiSW\STM32\AN3268-STM32Disc-SYSTick-Atollic
inside it there is the directory:
an3268
In this directory (an3268) there is the software concerning the an3268
- We want to use the example:
GPIOTogle - What does the example:
The program will flash the two LEDs (green and blue) present on STM32 Discovery.
STEP n.1
Start:
Atollic TrueSTUDIO and Select the: TrueSTUDIO under: Master Workspace directory
C:\EsempiSW\STM32\AN3268-STM32Disc-SYSTick-Atollic\an3268\stm32vldiscovery_package\Project\Master
Workspace\TrueSTUDIO
and press OK
and press OK
From the window that appear click on:
Start using TrueSTUDIO
STEP n.2
Now, select:
File->Import
and from the window that appear
select:General->Existing
Project into Workspace
and press: Next
From the new window that appear
click on Browse and select:C:\EsempiSW\STM32\AN3268-STM32Disc-SYSTick-Atollic\an3268\stm32vldiscovery_package\Project\Examples\SysTick
and press OK
and then press: and press OK
Finish
STEP n.3
Now click on:
Windows->Preferences
from the window that appear select: General->Workspace->Linked
Resources
Now press: New
add
a variable path named "CurPath"
that is:
C:\EsempiSW\STM32\AN3268-STM32Disc-SYSTick-Atollic\an3268\stm32vldiscovery_package
and then press: C:\EsempiSW\STM32\AN3268-STM32Disc-SYSTick-Atollic\an3268\stm32vldiscovery_package
OK
STEP n.4
Compile the project, for do this press:
Cltrl+B or press the icon: 
STEP n.5
Debug the project
Select the name of the project, in my case:
SysTick
and then press F11 or the the: insect icon  and verify that the configurations are the same of the
figure below.
and verify that the configurations are the same of the
figure below.
Press OK and you are in debug windows, which provides a number of docking views and windows suitable for debugging
ATTENTION: If you see on the display a windows like this:

You are in debug but the debug environment is not open, to open the debug environment press on the insect icon, see above the red arrow.
A number of execution control functions are now available from the Run Menu.

Alternatively, use the corresponding execution control commands in the Run control toolbar.

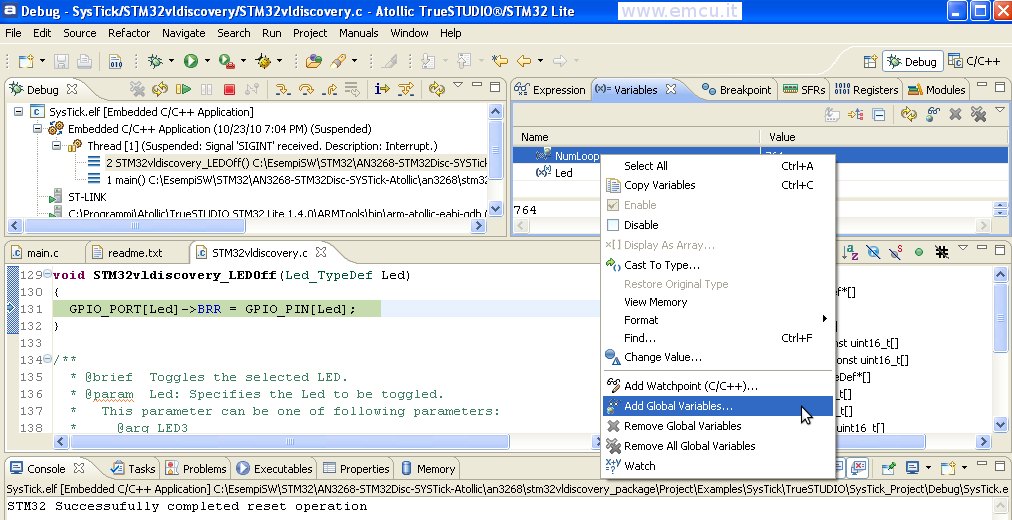
Variables:
The
Global Variables are automatically
displayed in the Variable Window.
For add a Global Variable to the Window Variable do this:
click inside it with the right button of mouse and from the popup windows select:
For add a Global Variable to the Window Variable do this:
click inside it with the right button of mouse and from the popup windows select:
Add Global Variables
Another
way to add a Global Variable is clik on the icon: 
Breakpoint
For
insert Breakpoint click twice near the
number of the line.
For remove Breakpoint click twice on it.
For remove Breakpoint click twice on it.
ASM
For
see the ASM code click on the icon 
Stop Debug
When the debug session is completed, the
running application must be stopped by clicking on the icon: 
Atollic TrueSTUDIO now automatically switch to the C/C++ editing perspective.
Atollic TrueSTUDIO now automatically switch to the C/C++ editing perspective.
Preconditions:
- The PC operating system is Windows XP SP3.
- In the PC is installed the free Atollic software (TrueSTUSIO STM32 Lite 1.4.0).
- For test the example below is used the STM32 Discovery.
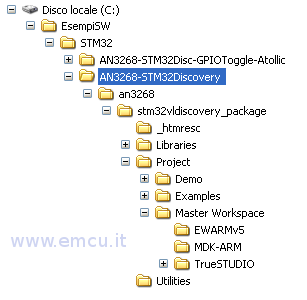
- We use
the directory:
C:\EsempiSW\STM32\AN3268-STM32Discovery
STEP n.1
Start:
Atollic TrueSTUDIO and Select the: TrueSTUDIO under: Master Workspace directory
C:\EsempiSW\STM32\AN3268-STM32Discovery\an3268\stm32vldiscovery_package\Project\Master
Workspace\TrueSTUDIO
and press OK
and press OK
From the window that appear click on:
Start using TrueSTUDIO
STEP n.2
Now, select:
File->Import
and from the window that appear
select:General->Existing
Project into Workspace
and press: Next
From the new window that appear
click on Browse and select:C:\EsempiSW\STM32\AN3268-STM32Discovery\an3268\stm32vldiscovery_package\Project\Examples
and press OK
Next, press: and press OK
Finish
STEP n.3
Now click on:
Windows->Preferences from
the window that appear select:
General->Workspace->Linked Resources
Now press: New
add
a variable path named: CurPath
and press: Folder
and select: C:\EsempiSW\STM32\AN3268-STM32Discovery\an3268\stm32vldiscovery_package
and then press: and press: Folder
and select: C:\EsempiSW\STM32\AN3268-STM32Discovery\an3268\stm32vldiscovery_package
OK
STEP n.4
Compile the project, for do this...
Select the example that you want to test, for example:
SysTick
and then press: Project->Build Project
(see below)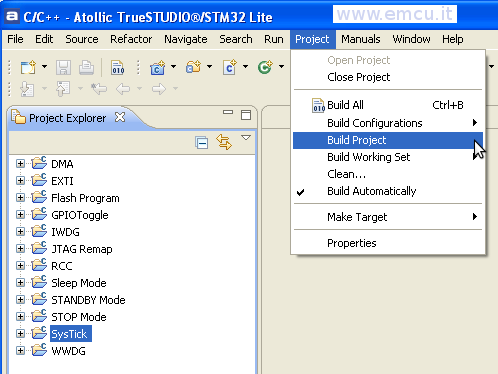
You must see the result below:
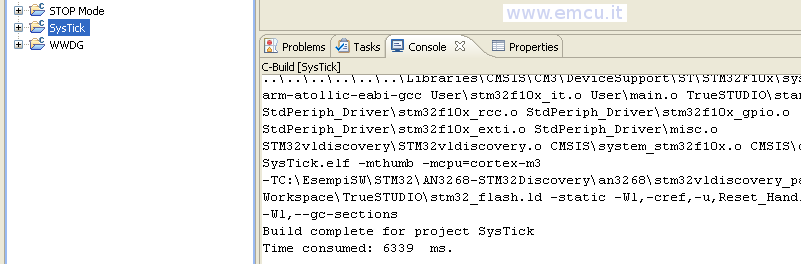
STEP n.5
Debug the project
Select the name of the project, in my case:
SysTick
and then press F11 or the the: insect icon
 and verify that the configurations are the same of the
figures below.
and verify that the configurations are the same of the
figures below.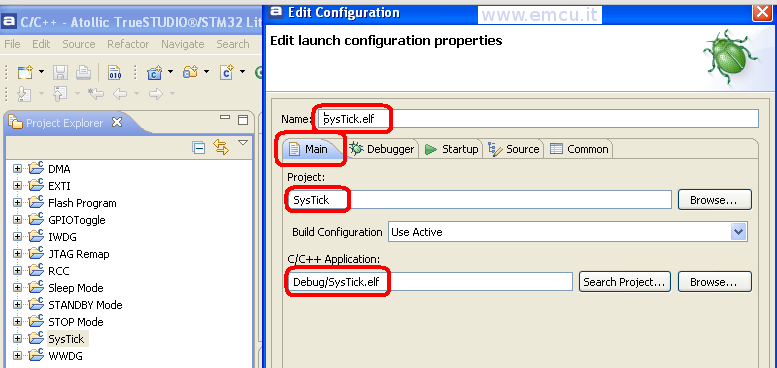
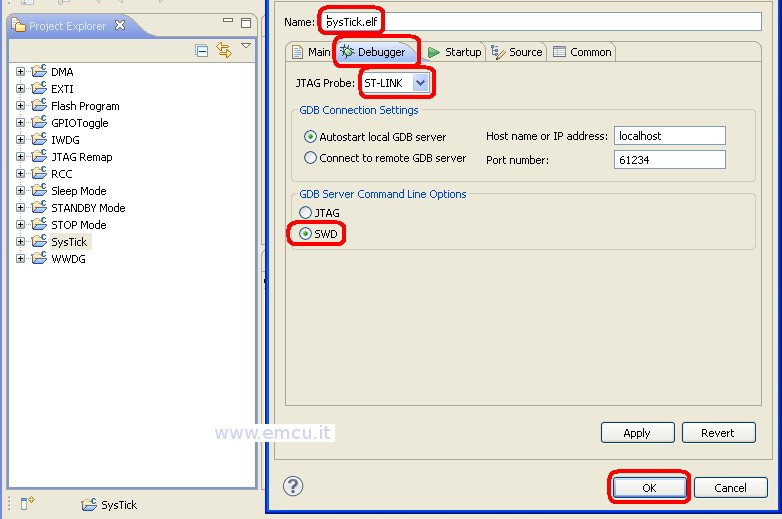
Press OK and you are in debug windows, which provides a number of docking views and windows suitable for debugging.
ATTENTION: If you see on the display a windows like this:
You are in debug but the debug environment is not open, to open the debug environment press on the insect icon, see above the red arrow.
A number of execution control functions are now available from the Run Menu.
Alternatively, use the corresponding execution control commands in the Run control toolbar.
Variables:
The
Global Variables are automatically
displayed in the Variable Window.
For add a Global Variable to the Window Variable do this:
click inside it with the right button of mouse and from the popup windows select:
For add a Global Variable to the Window Variable do this:
click inside it with the right button of mouse and from the popup windows select:
Add Global Variables
Another
way to add a Global Variable is clik on the icon:
Breakpoint
For
insert Breakpoint click twice near the
number of the line.
For remove Breakpoint click twice on it.
For remove Breakpoint click twice on it.
ASM
For
see the ASM code click on the icon
Stop Debug
When the debug session is completed, the
running application must be stopped by clicking on the icon:
Atollic TrueSTUDIO now automatically switch to the C/C++ editing perspective.
Atollic TrueSTUDIO now automatically switch to the C/C++ editing perspective.
STM32 home page