


Suggested reading:
Preconditions:
Click here to get this SW Example ready to use (STM32-Discovery-Exe1)
Topics:
Starting the Atollic Lite
After installing Atollic TrueSTUDIO®/STM32 on your computer click on:
Start ---> Programs ---> Atollic ---> TrueSTUSIO STM32 Lite 1.4.0 ---> Atollic TrueSTUDIO STM32 Lite
The program is then started and query for the Workspace location.
Select the folder that will contain your projects and click on the OK button.
A Welcome window is displayed.
Click on the Start using TrueSTUDIO link.
The Welcome window is removed, but can be opened again later using the Help, Welcome menu command.
Click here to go on the top
Create a New Project
Start ATOLLIC software and from the FILE menu select: NEW and C Project (see fig.1)
fig.1

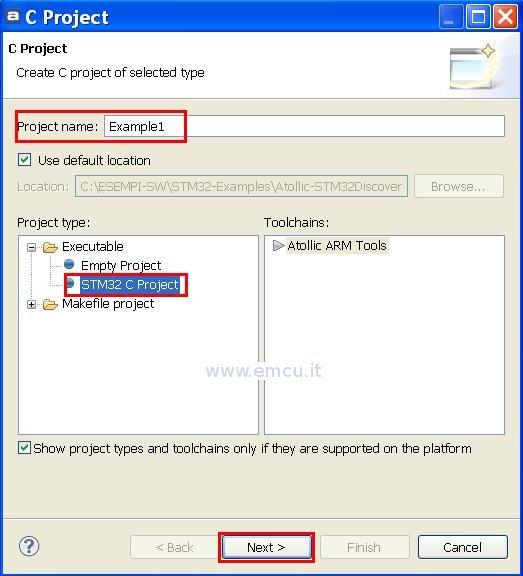
Now the C project configuration pannel is displayed (fig.2).
Enter a Project Name (Example1), select STM32 C Project and click on the Next button.
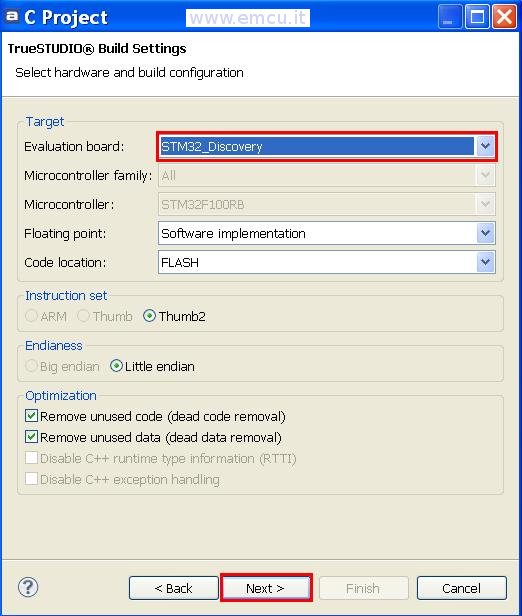
Now the TrueSTUDIO Build Settings page is displayed (fig.3).
From the page select STM32_Discovery board and click on the Next button.
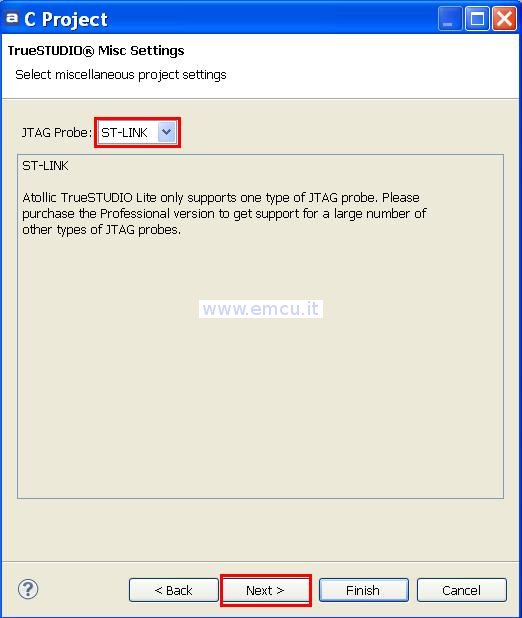
Now the TrueSTUDIO Misc Settings page is displayed (fig.4).
Now verify that is selected ST-LINK because ATOLLIC Lite supports only it.
Click on the Next button.
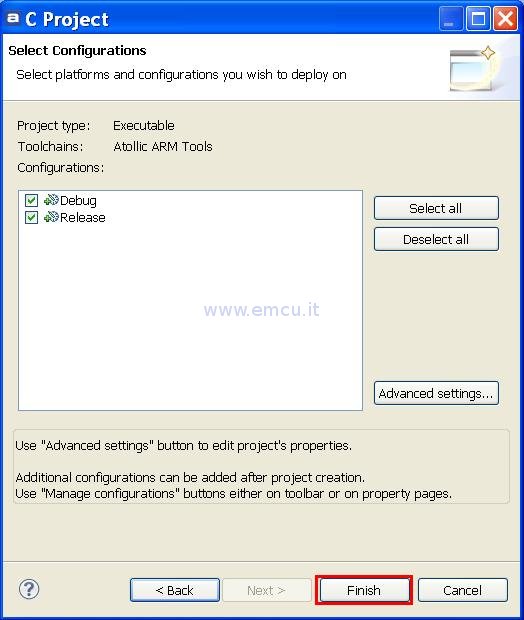
Now the TrueSTUDIO Select Configuration page is displayed (fig.5).
Click on the Finish button to generate a new C project.
Click here to go on the top
Building project
Now there is an example ready to use for STM32 Discovery board.
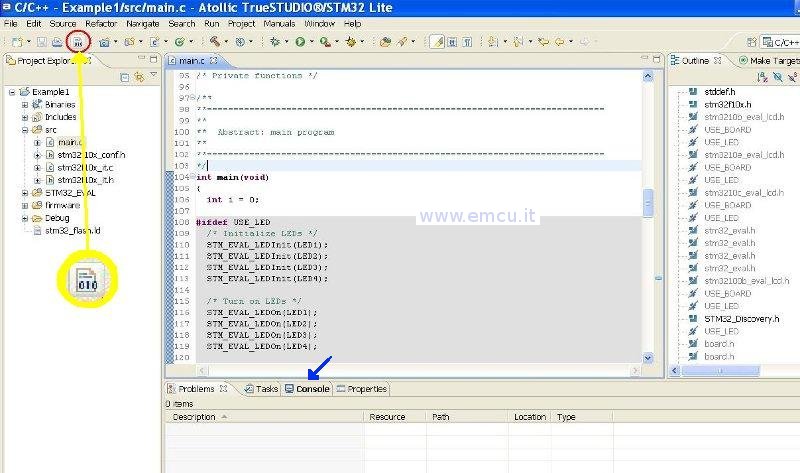
Inside the src folder there are main.c , stm32f10x_conf.h , stm32f10x_it.c and stm32f10x_it.h files (fig.6).
By default, Atollic TrueSTUDIO® builds the project automatically whenever any file in the build dependency is updated. This feature can be toggled using the Project, Build Automatically menu command. As automatic building is switched on by default, new projects created by the project wizard are built automatically when the projects are created.
To build all click on the icon circled in red below (fig.6).
Open the Console view by clicking on its tab title (blue arrow on fig.6). This will ensure you can see the build process.
Click here to go on the top
Debugging
Atollic TrueSTUDIO includes a very powerful graphical debugger based on the gdb command line debugger.
Atollic TrueSTUDIO/STM32 also bundle GDB servers for some of the supported JTAG probes, including the ST-LINK JTAG probe.
ATTENTION: Atollic TrueSTUDIO/STM32 Lite (the free version) support only ST-LINK SWD debug mode.
Atollic TrueSTUDIO auto-start and auto-stop the gdbserver as needed, thus creating a seamless integration of debug servers.
Make sure to have select your project: STM32100B-EVAL
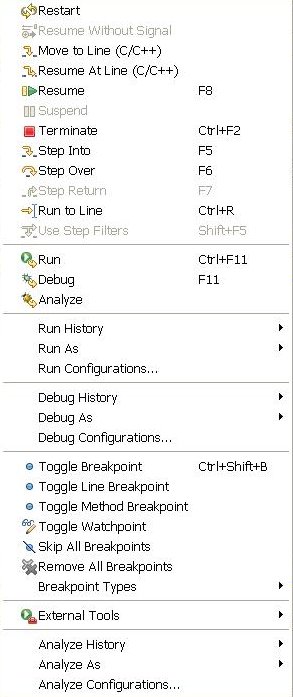
and click on the Debug toolbar button (the insect icon ) or the F11 key to start the debug session.
The first time debugging is started for a project, Atollic TrueSTUDIO display a dialog box that enable developers to confirm the debug configuration before launching the debug session (fig.7).
After the first debug session is started, this dialog box will not be displayed any more.
For this example no changes are requested.
In any case verify that the Debug menu is setted like below (fig.8) and click on the OK button to start the debug session.
Atollic TrueSTUDIO launches the debugger, and switches to the Debug perspective, which provides a number of docking views and windows suitable for debugging (fig.9) .

Alternatively, use the corresponding execution control commands in the Run control toolbar.
Variables:
Breakpoint
ASM
Stop Debug
Click here to go on the top
Preconditions:
- The PC operating system is Windows XP SP3.
- In the PC is installed the free Atollic software (TrueSTUSIO STM32 Lite 1.4.0).
- The example below is based on STM32 Discovery.
- What does the example:
The example test the USER Button and consequently change the status of the green and blue leds.
Click here to get this SW Example ready to use (STM32-Discovery-Exe1)
Topics:
Starting the Atollic Lite - click here
Create a new project - click here
Building project - click here
Debugging - click here
Create a new project - click here
Building project - click here
Debugging - click here
Starting the Atollic Lite
After installing Atollic TrueSTUDIO®/STM32 on your computer click on:
Start ---> Programs ---> Atollic ---> TrueSTUSIO STM32 Lite 1.4.0 ---> Atollic TrueSTUDIO STM32 Lite
The program is then started and query for the Workspace location.
Select the folder that will contain your projects and click on the OK button.
A Welcome window is displayed.
Click on the Start using TrueSTUDIO link.
The Welcome window is removed, but can be opened again later using the Help, Welcome menu command.
Click here to go on the top
Create a New Project
Start ATOLLIC software and from the FILE menu select: NEW and C Project (see fig.1)
fig.1
Now the C project configuration pannel is displayed (fig.2).
Enter a Project Name (Example1), select STM32 C Project and click on the Next button.
fig.2
Now the TrueSTUDIO Build Settings page is displayed (fig.3).
From the page select STM32_Discovery board and click on the Next button.
fig.3
Now the TrueSTUDIO Misc Settings page is displayed (fig.4).
Now verify that is selected ST-LINK because ATOLLIC Lite supports only it.
Click on the Next button.
fig.4
Now the TrueSTUDIO Select Configuration page is displayed (fig.5).
Click on the Finish button to generate a new C project.
fig.5
Click here to go on the top
Building project
Now there is an example ready to use for STM32 Discovery board.
Inside the src folder there are main.c , stm32f10x_conf.h , stm32f10x_it.c and stm32f10x_it.h files (fig.6).
By default, Atollic TrueSTUDIO® builds the project automatically whenever any file in the build dependency is updated. This feature can be toggled using the Project, Build Automatically menu command. As automatic building is switched on by default, new projects created by the project wizard are built automatically when the projects are created.
To build all click on the icon circled in red below (fig.6).
Open the Console view by clicking on its tab title (blue arrow on fig.6). This will ensure you can see the build process.
fig.6
Click here to go on the top
Debugging
Atollic TrueSTUDIO includes a very powerful graphical debugger based on the gdb command line debugger.
Atollic TrueSTUDIO/STM32 also bundle GDB servers for some of the supported JTAG probes, including the ST-LINK JTAG probe.
ATTENTION: Atollic TrueSTUDIO/STM32 Lite (the free version) support only ST-LINK SWD debug mode.
Atollic TrueSTUDIO auto-start and auto-stop the gdbserver as needed, thus creating a seamless integration of debug servers.
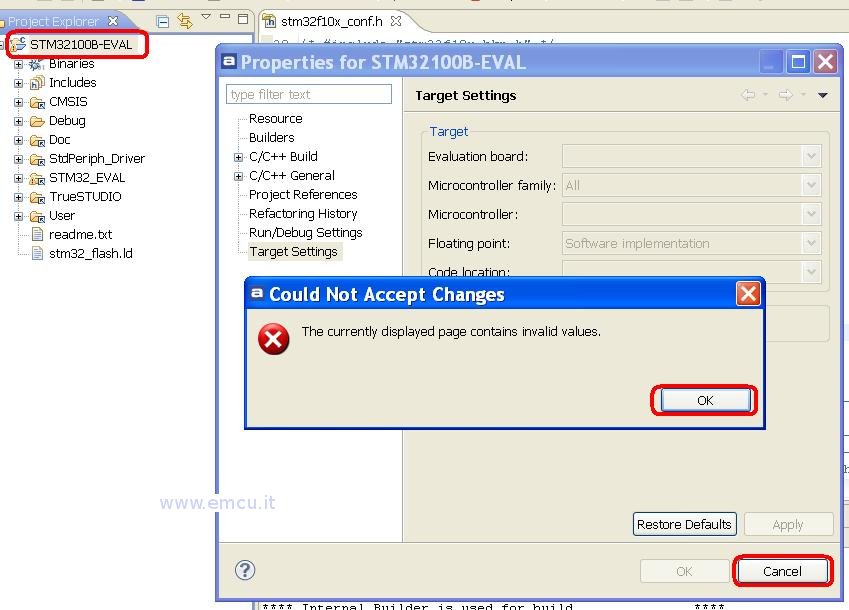
Make sure to have select your project: STM32100B-EVAL
and click on the Debug toolbar button (the insect icon
) or the F11 key to start the debug session.The first time debugging is started for a project, Atollic TrueSTUDIO display a dialog box that enable developers to confirm the debug configuration before launching the debug session (fig.7).
In the window fig.7 you must per OK and after it Cancel
fig.7
After the first debug session is started, this dialog box will not be displayed any more.
For this example no changes are requested.
In any case verify that the Debug menu is setted like below (fig.8) and click on the OK button to start the debug session.
fig.8

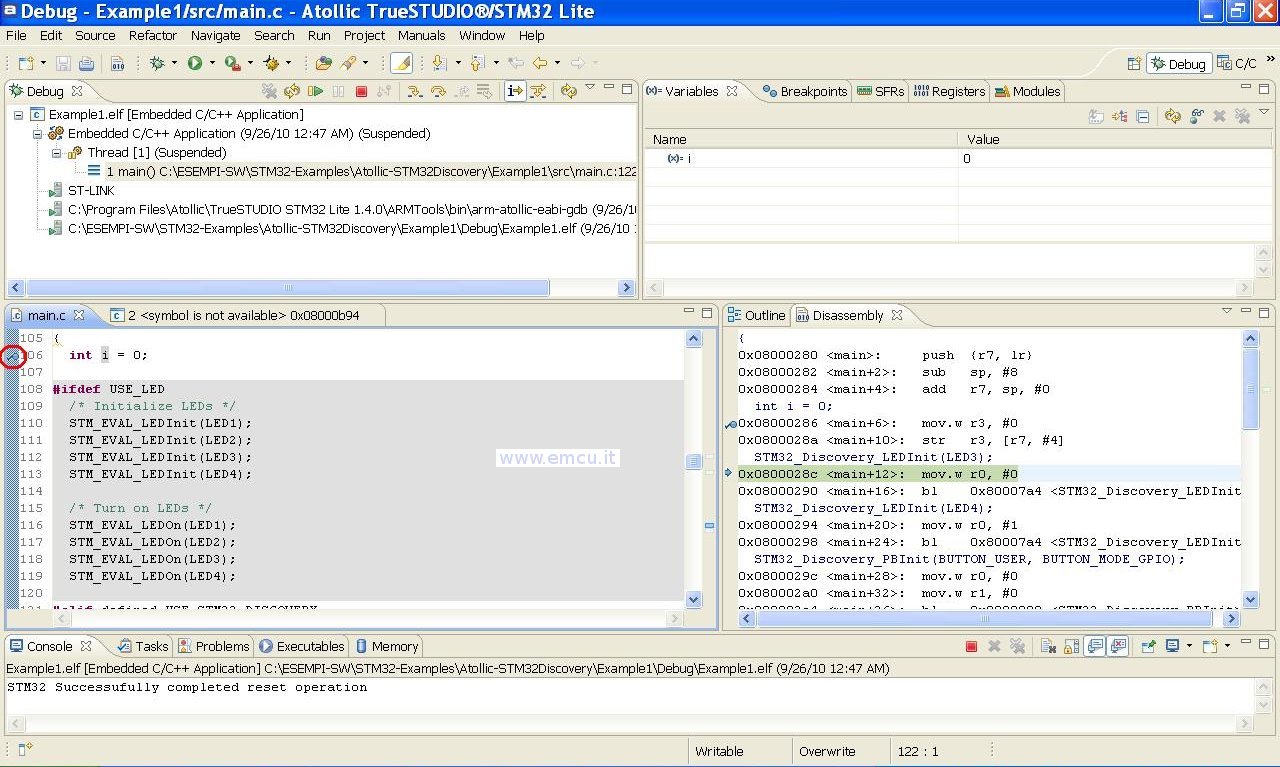
Atollic TrueSTUDIO launches the debugger, and switches to the Debug perspective, which provides a number of docking views and windows suitable for debugging (fig.9) .
fig.9
A number of execution control functions are now available from the Run menu.
Variables:
The Global Variables are automatically displayed in the Variable Window, fig.9, see on top and right.
For add a Global Variable to the Window Variable do this:
click inside it with the right button of mouse and from the popup windows select:

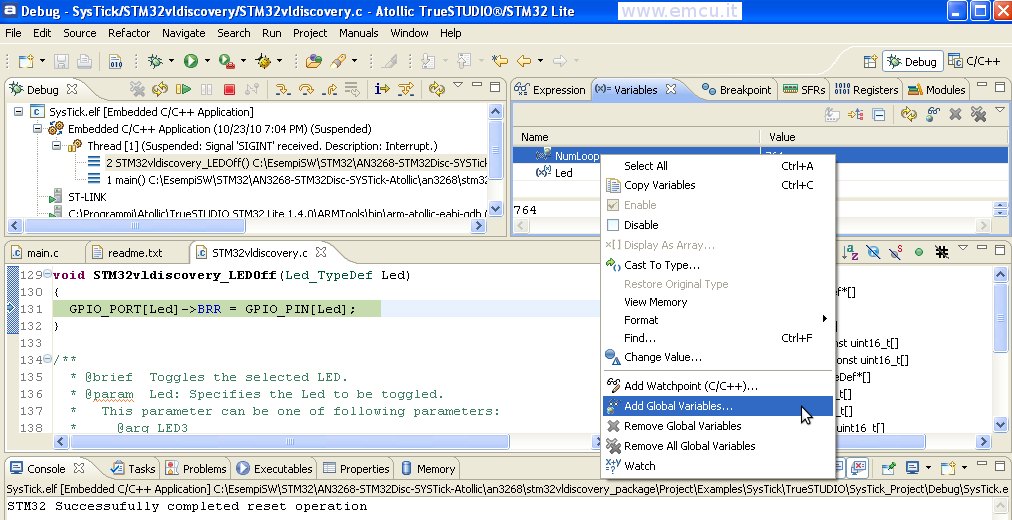
For add a Global Variable to the Window Variable do this:
click inside it with the right button of mouse and from the popup windows select:
Add Global Variables
Another way to add a Global Variable is clik on the icon: Breakpoint
For insert Breakpoint click twice near the number of the line fig.9 red circle.
For remove Breakpoint click twice on it.
For remove Breakpoint click twice on it.
ASM
For see the ASM code click on the icon 
Stop Debug
When the debug session is completed, the running application must be stopped by clicking on the icon: 
Atollic TrueSTUDIO now automatically switch to the C/C++ editing perspective.
Atollic TrueSTUDIO now automatically switch to the C/C++ editing perspective.
Click here to go on the top
LINK:
ATOLLIC: http://www.atollic.com/
Download Atollic Page for STM32: http://www.atollic.com/index.php/download/downloadstm32
If you need the example of this tutorial click here
Download Atollic Page for STM32: http://www.atollic.com/index.php/download/downloadstm32
If you need the example of this tutorial click here