
how to...

 For
the Italian
version click here
For
the Italian
version click hereHow to configure modem for ADSL and WiFi Pirelli Discus DRG A124G
Click Here to get manual of Pirelli Discus DRG A124G.
ADSL
modem WiFi Pirelli
Discus DRG A124G
is one that is given as loan for use
with the ADSL subscription to:
WIND - LIBERO - INFOSTRADA.
To use it properly need to configure:
-
Access the configuration menu of the modem
-
Change the password for access to our modem so that other people can access and change configurations
-
If you want to use eMule and aMule (Linux version) should open the doors of communication to get a high ID.
-
Setting up a WiFi connection for secure access
- Configure your Username and Password to access to WIND - LIBERO -
INFOSTRADA
- Configure CISCO SYSTEM VPN Client
Here's how to do.
Remember
that
after any change you must save it by press SAVE SETTINGS.
Remember that when you press
SAVE SETTINGS is necessary wait some second before that the modem
accepts another selection.
Access the configuration menu of the modem To access our modem we have to open Internet Explorer or Mozilla or browser we use and in the address bar we write:
http://192.168.1.1
after which there will appear the screen fig.1 where to put the default password of modems.

Username: admin
Password: admin
After the login, the new screen that appears is the main menu of the modem, shown in fig.2

Changing of password access to the modem
To change the password for access to our modem you just click on SYSTEM (fig.2), next click on Password Settings and in the menu that appears you will insert the old password and twice the new password and then you press the Save Settings button. See fig.3 below.

NOTE:
The box named Idle Time Out if there are not activity, after the time specified the logout is done.
During the setup of the modem I suggest to disable the TimeOut (put 0 in the box) and after the setup I suggest to enable TimeOut again.
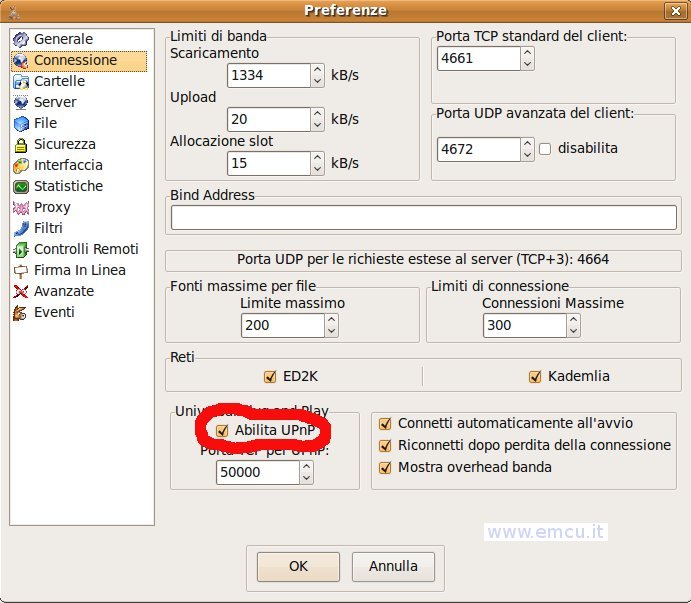
Use eMule and aMule (Linux version) with a high ID
To get an access to your files faster than
with eMule
and aMule we should get a high ID and to do that we must make passing
the channels of communication used outwards.
To do so from the main menu of the modem (Fig. 2) select the UPnP and Enable it (fig.4).

Of course, it is also necessary configure aMule or eMule to use UPnP, see fig.4.1
Setting up a WiFi connection for secure access
It
'a good idea to configure the WiFi network in order to have an access
to the safest possible though, remember always, WiFi networks are
always to be decrypted, the secure access is to connected the PC to the
cable modem.
Usually the Libero modem comes with WiFi free access that allows anyone
in the area to connect to our modem.
The advice is to change the access WiFi enabling WEP encryption.
Usual from the main menu (fig.2) Select Wireless and
from the menu that appears (fig.5) ensure
that Wireless is enable.

Next click on Channel and SSID and ensure that ESSID Broadcast is Enable, fig.6.

Net click on Security and select WEP Only, fig.7.
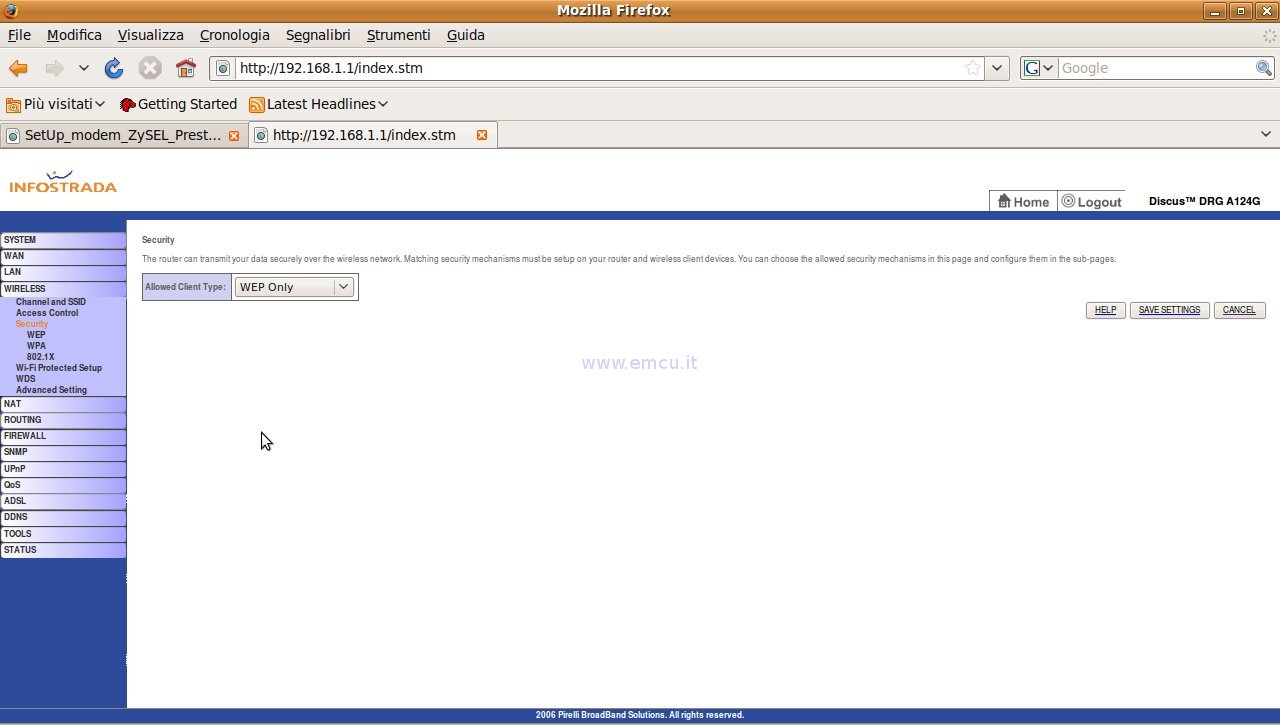
Next click on WEP and configure as fig.8, in the box named Key 1 insert a password of 13 character and press SAVE SETTINGS.

Configure your Username and Password to access to WIND - LIBERO - INFOSTRADA
From the main page press WAN and from the new page that appear press ATM PVC.
The page that appear is show in fig.9

Now press on VC1 and the new menu that appear is show in fig.10 (red circle).
In this menu insert your USERNAME and PASSWORD.
At the end press SAVE SETTINGS.

Configure CISCO SYSTEM VPN Client
If for your job you use Cisco System VPN Client you must press NAT and ensure that it is flag Enable, look fig.11

Now open your VPN Client and select your default connection, fig.12 red arrow A.
Next selec Modify (fig.12 read arrow B) and from the new menù that appear press Transport (fig.12 rea arrow C) and annotate the number of TCP Port (fig.12 red arrow D) and must shure that is selected ISPSec over TCP (fig.12 red arrow E).

Now back to the menù of PIRELLI Discus DRG A124G and select Special Application and configure the menù as the fig.13 at the end press SAVE SETTINGS.
We wrote 10000 because it is what we read in the TCP Port box of fig.12 arrow D.

Well we did everything we need, for end press Logout.