
-
How to update the GUI on PC and on STM32 Eval Boards
for using the Motor Control Kit
(Motor Control Workbench)
How to update the GUI on PC and on STM32 Eval Boards
for using the Motor Control Kit
(Motor Control Workbench)

The new release of the motor ctrl SW/FW require the GUI update on your PC and an update of the GUI present on the STM32 EvaBoard that you want to use.
- How to install the Motor Control GUI on STM32 Eval Board and on the PC version 4.2.0 is here
- How to install the Motor Control GUI on STM32 Eval Board and on the PC version 4.1.0 is here
- How to install the Motor Control GUI on STM32 Eval Board and on the PC version 4.0.0 is here
- How to install the Motor Control GUI on STM32 Eval Board and on the PC version 3.0.0 is here
-
How to install the Motor Control GUI on STM32 Eval Board and on the PC version 4.2.0
- Coming soon
-
How to install the Motor Control GUI on STM32 Eval Board and on the PC version 4.1.0
- Introduction
- Install FOC v.4.1.0 – Install the FOC on PC (Windows 7)
- etc...
ATTENTION:
This PDF is only for SILICA & STM customers.
If you is SILICA customers, please ask me the password for:
This PDF is only for SILICA & STM customers.
If you is SILICA customers, please ask me the password for:
How to install the Motor Control GUI on STM32 Eval Board and on the PC (STM PSM FOC v.4.1.0)
Please specify your Name, CITY, COUNTRY and your contact in SILICA.
If you are STM customers, please contact your local STM office.-
How to install the Motor Control GUI on STM32 Eval Board and on the PC version 4.0.0
- Introduction
- Install FOC v.4.0.0 – Install the FOC on PC (Windows 7)
- 1° step - Install the LCD FW on the evaboard that we want to use
- 2° step - Copy the directory: C:\Program Files (x86)\STMicroelectronics\FOC SDK
- 3° step - Prepare the second part of the FW
- 4° step - Generation of the second part of the FW and install it
- IAR explanations
- KEIL explanations
- 5° step - Modify the STM324xG-EVAL for MC
The PDF that contain the explanations is here.
ATTENTION:
This PDF is only for SILICA & STM customers.
If you is SILICA customers, please ask me the password for:
This PDF is only for SILICA & STM customers.
If you is SILICA customers, please ask me the password for:
How to install the Motor Control GUI on STM32 Eval Board and on the PC (STM PSM FOC v.4.0.0)
Please specify your Name, CITY, COUNTRY and your contact in SILICA.
If you are STM customers, please contact your local STM office.-
How to install the Motor Control GUI on STM32 Eval Board and on the PC version 3.0.0
- Introduction
- Official link
- Update the GUI of your PC
- Update the GUI of the STM32 evaboard you want to use
The block diagram of a generic motor controller kit is show below.

- On the PC must be installed the:
STSW-STM32003 - ST MC Workbench (PC GUI configuration tool for the STM32 PMSM FOC SDK motor control firmware library) - On the STM32 Controller Board (or Eva Board) must be installed the:
STSW-STM32100 - STM32 PMSM FOC SDK motor control firmware library (UM1052)
Choose the STM32 Controller Board (or Eva Board) from here, see the STM32xxx-EVAL and STM32xxx-MCKIT. See also here. - The Inverter Board must be chosen to meet the motor characteristics. See here the STEVAL-IHMxxx. See also here.
- STM3210B-MCKIT - Motor control starter kit for STM32 (128KB flash) Performance and Access Line microcontrollers
- STSW-STM32003 - ST MC Workbench (PC GUI configuration tool for the STM32 PMSM FOC SDK motor control firmware library)
- STSW-STM32100 - STM32 PMSM FOC SDK motor control firmware library (UM1052)
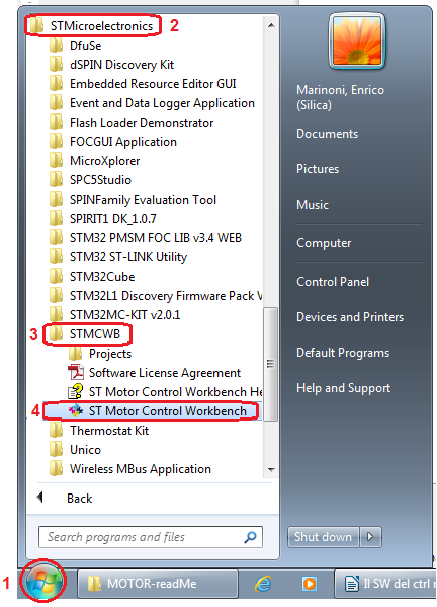
First go here and download and install the new: ST MC Workbench (STSW-STM32003).
After unpacking the file, you just need to install it, so the upgrade of the PC will be realized.
Now is necessary download the FW library and update the STM32 EvalBoard that you need to use in your Motor Control Kit, see here.
After unpacking the file, you just need to install it, so the upgrade of the PC will be realized.
Now is necessary download the FW library and update the STM32 EvalBoard that you need to use in your Motor Control Kit, see here.
-
Update the GUI of the STM32 evaboard you want to use
Now is necessary download the FW library and update the STM32 EvalBoard that you need to use in your Motor Control Kit.
Download the FW library from here (STSW-STM32100).

Just press the download button, (see below), you will be redirected to the page: myST Home.
If this is the first time you enter you will need to register in order to continue.
If this is the first time you enter you will need to register in order to continue.
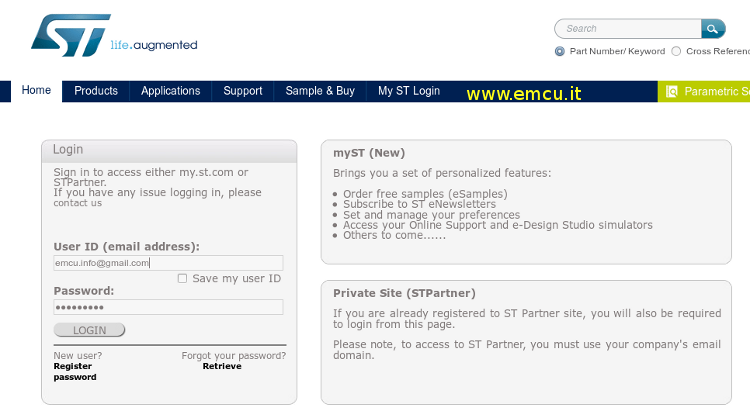
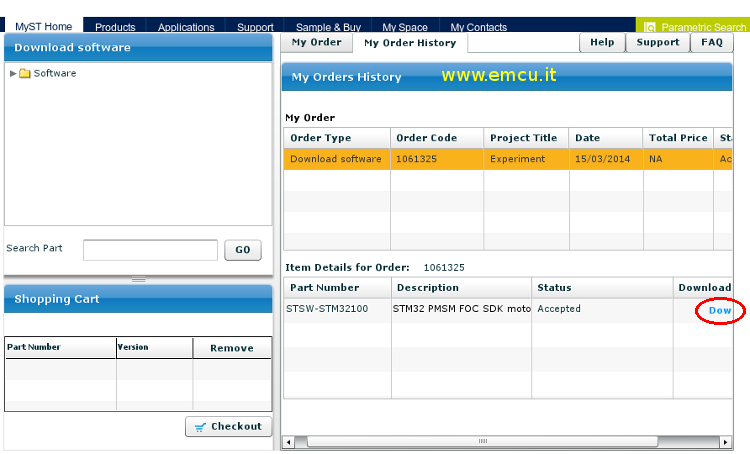
Entered into myST select the file to download and click on Checkout.
You will see a new window where you have to accept the license terms.
A new widow will appear, fill it with your data of project and click on: Confirm Download
At this point, the final window will appear tells you to enter in: My Oder History
Finally, you can download the FW "STSW-STM32100" (see below).
After unpacking the file, install it.
The SW ctrl engine on Windows, is installed here:
C:\Program Files (x86)\STMicroelectronics\STM32 PMSM FOC LIBv3.4_WEB
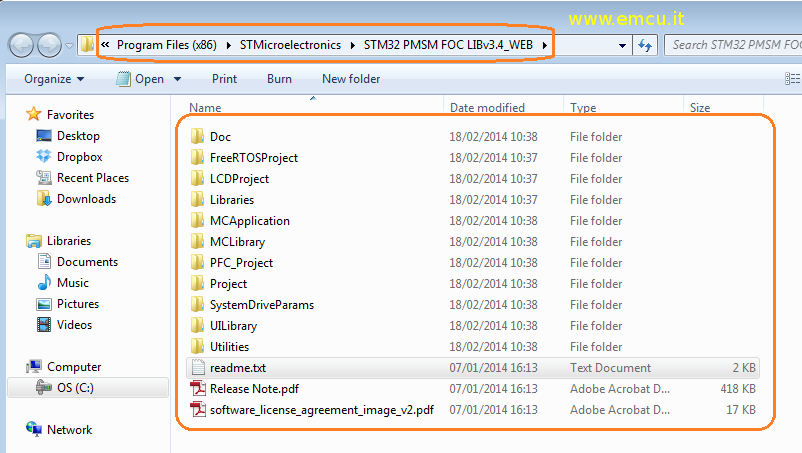
LIBv3.4_ WEB will change in according to the FW release that will be issued.
Copy the entire contents of the folder over to a new directory (let's call it MOTOR-F3) that we will use to perform the upgrade.
Now is necessary download the new GUI on the STM32 EvaBoard you want to use.
Go to:
C:\Program Files (x86)\STMicroelectronics\STM32 PMSM FOC LIBv3.4_WEB\LCDProject\hex
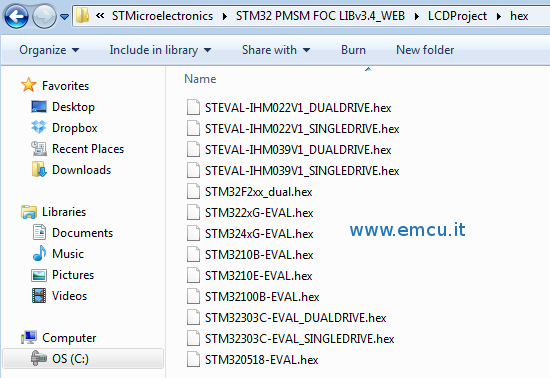
Choose the .hex file for your evaboard and download it using STLink Utility.
Having done this, yet nothing works because it serves also perform the steps listed below.
Now open the GUI ctrl motor WorkBench on your PC
See below.
Having done this, yet nothing works because it serves also perform the steps listed below.
Now open the GUI ctrl motor WorkBench on your PC
See below.
Select the EvaBoard that you want to use.

The above operation, prompting you to save the configuration, save it in the working directory MOTOR-F3 (MOTOR-F3 is created in the top of this part of explanation), that we will use for our tests.
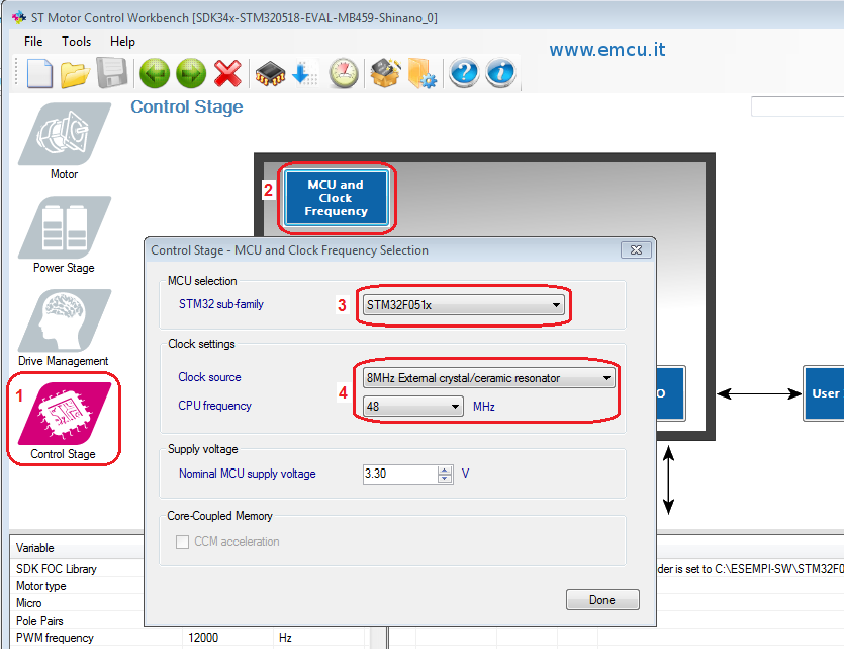
Check the: Control Stage -> MCU and Clock Frequency
that the MCU is the right one and the Clock is right one (see below)
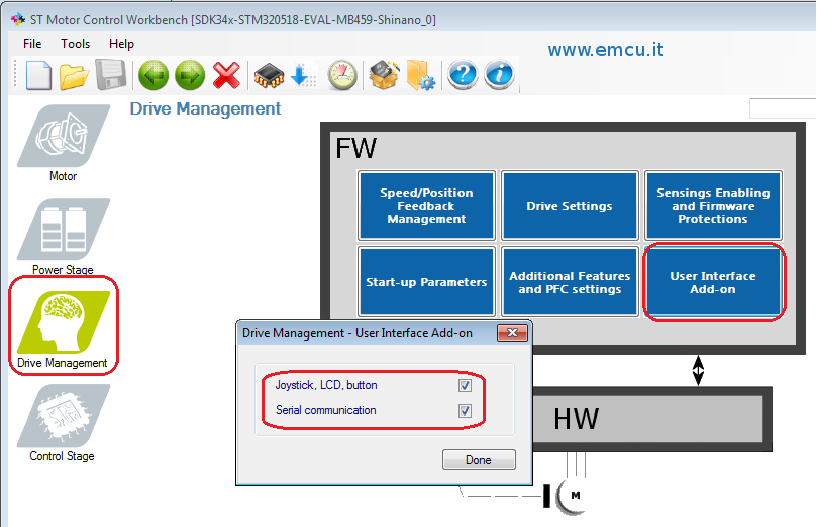
Then go to: Drive Manager -> User Interface
you must have joystick and serial enabled.
These options will be disabled in the real application.
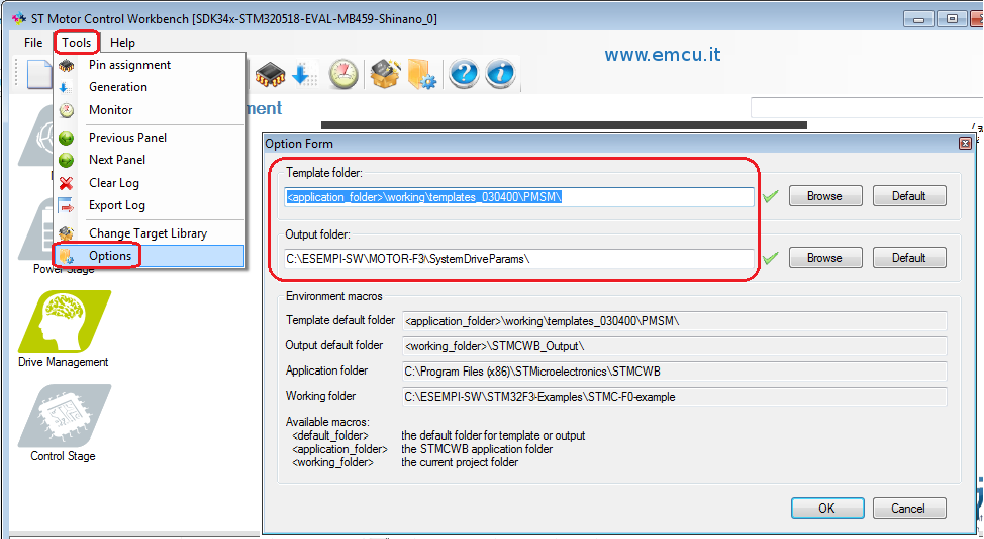
Go to: Tools -> Options
Select the output folder where to save the .h that will be generated.
Must be saved in SystemDriveParams.
At this point, press the BLUE arrow (Generation), see below.
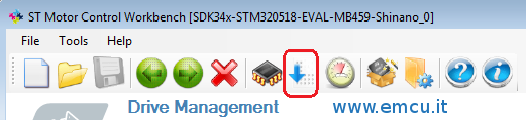
You must see something like this:

Obviously, the "Working folder" is the directory where you're putting the results, we had suggested above MOTOR-F3.
Now is necessary that on your PC is installed the IAR C compiler for ARM.
It is possible use the 32k Free version.
Open IAR and load:
File -> Open -> Workspace
Load from: C: \ EXAMPLES-SW \ MOTOR-F3 \ Project \ EWARM
the project for the evaboard that you are using.
Of course the: C:\EXAMPLES-SW\MOTOR-F3\
is our working directory. Change the tree above, with yours working directory.
is our working directory. Change the tree above, with yours working directory.
Now press F8 to MAKE total project and select the appropriate evaboard.
At the end of Make you must have: 0 errors and 0 warnings
Press the right mouse button on the project name and select OPTIONS
At the end of Make you must have: 0 errors and 0 warnings
Press the right mouse button on the project name and select OPTIONS
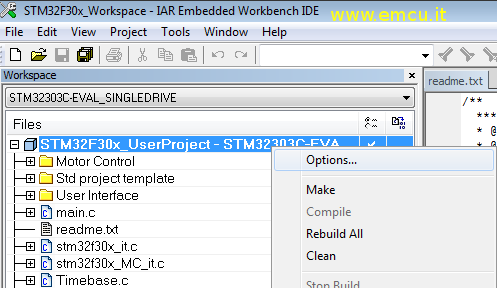
From the window that appears you select DEBUG and choose the emulator you want to use.
Press Download and Debug to program the evaboard.
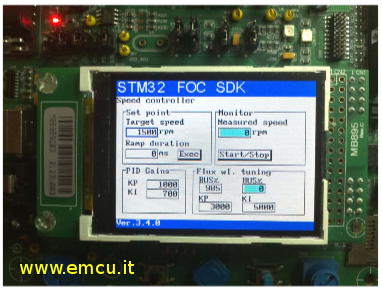
Now close the Debug and on the evaboard that you are using must appear the GUI menu of the motor ctrl.
See below.
At this point the FW update is finished.