
Home
Page
STM32 Page
What is necessary install on PC

At the end of the installation a window will appear instructing you to install FTDI driver.
You can find the driver in .../Install/SW directory (see below).

How to configure DiZiC dongle
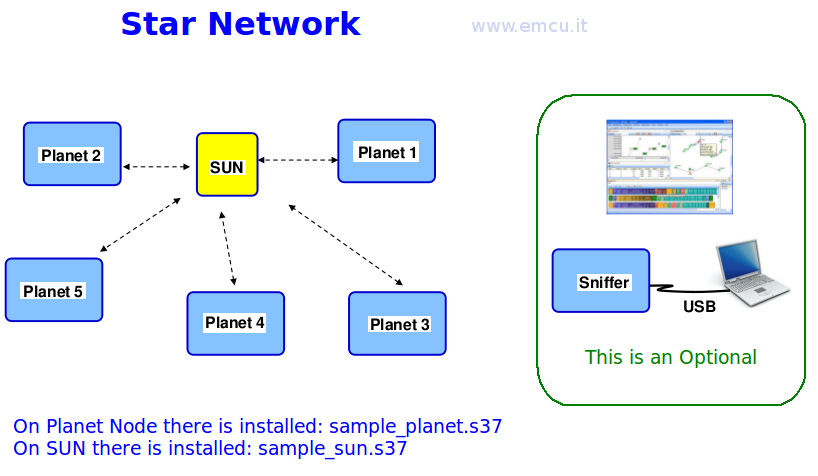
On the PLANET Node (Planet 1, Planet 2, etc) there is installed: sample_planet.s37
On the SUN Node there is installed: sample_sun.s37
For install the SW follow the steps below.
Inset into the PC the DiZiC dongle and follow the instructions below.

ATTENTION: COM?? is the virtual com port (USB Serial Port) related to the dongle that you are inserted in your PC.
To know the virtual com port follow the instructions below.

How to create Star Network
STM32 Page
INDEX
Introduction
What is necessary install on PC
How to configure DiZiC dongle
How to create Star Network
Using Peryton SW for Sniffer the Network
DownLoad the software for this example
What is necessary install on PC
How to configure DiZiC dongle
How to create Star Network
Using Peryton SW for Sniffer the Network
DownLoad the software for this example
For do this demo we
use the DiZiC dongle (LT: USB20101105 - rev.C) http://dizic.com/
The minimum configuration includes 2 dongle.
I've used 4 dongle for this tutorial.
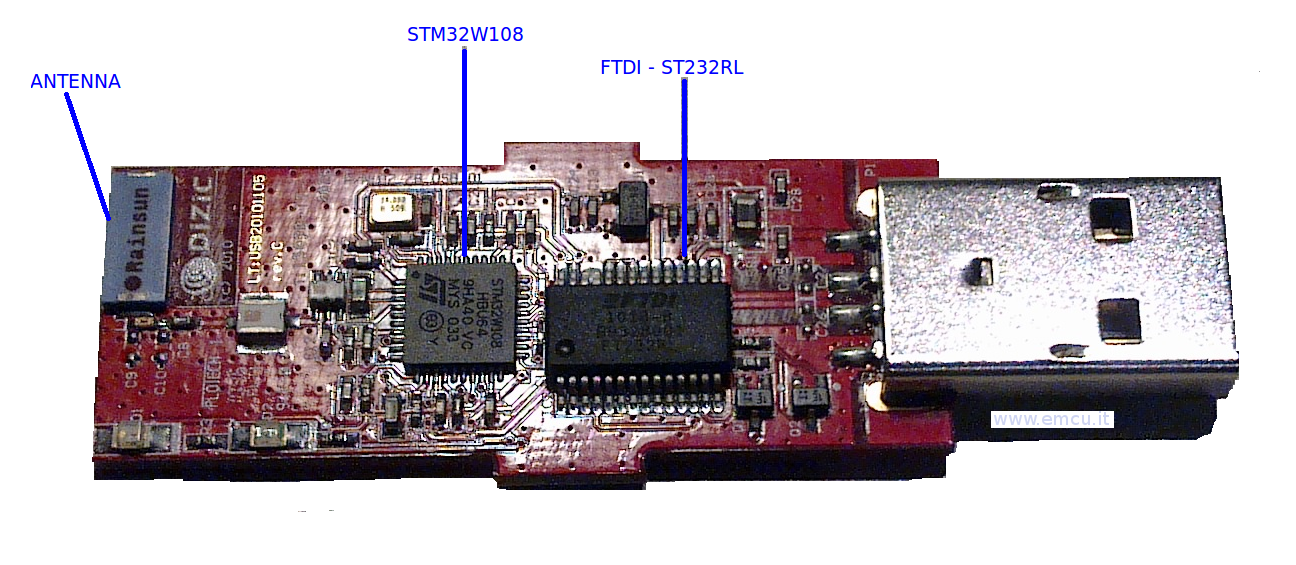
Inside the DiZiC there is:
The minimum configuration includes 2 dongle.
I've used 4 dongle for this tutorial.
1 SUN dongle (master)
2 PLANET dongle (slaves)
1 PERYTON dongle (sniffer)
2 PLANET dongle (slaves)
1 PERYTON dongle (sniffer)
Inside the DiZiC there is:
Antenna Rainsun
FTDI
1018-B
B9328001
FT232RL
STM32W108HBU64
9HA40 VC
MYS 033
STM e3 Y

We use DiZiC dongle to create a ZigBee Star Network (Sun/Planet), see below.
What is necessary install on PC
On the PC must be installed the SW below that are in the .../Install/Stacks directory (see below):
ST_SimpleMAC-1.0.3.0-STM32W108.exe
ST_ZigBee_RF4CE-1.2.0.0-STM32W108.exe
EmberZNet-4.3.0.0-STM32W108.exe
ST_ZigBee_RF4CE-1.2.0.0-STM32W108.exe
EmberZNet-4.3.0.0-STM32W108.exe

At the end of the installation a window will appear instructing you to install FTDI driver.
You can find the driver in .../Install/SW directory (see below).

How to configure DiZiC dongle
On the PLANET Node (Planet 1, Planet 2, etc) there is installed: sample_planet.s37
On the SUN Node there is installed: sample_sun.s37
For install the SW follow the steps below.
Inset into the PC the DiZiC dongle and follow the instructions below.
- Open a DOS windows and go in the HandsOn directory, fo do this type the command:
cd C:\.......\ZigBee-StarNetwork\HandsOn
replace the ....... with the complete path. - For install the PLANET SW type the command:
stm32w_flasher.exe –s –p COM?? –f sample_planet.s37 - For install the SUN SW type the command
stm32w_flasher.exe –s –p COM?? –f sample_sun.s37

ATTENTION: COM?? is the virtual com port (USB Serial Port) related to the dongle that you are inserted in your PC.
To know the virtual com port follow the instructions below.
- Click on the icon My Computer
 with the right key and select Properties.
 - Next select Hardware tab and click on Device Manager.
- From the new windows that appear click on Ports (COM & LPT) and see the name of USB Serial Port that in the example below is COM42.

How to create Star Network
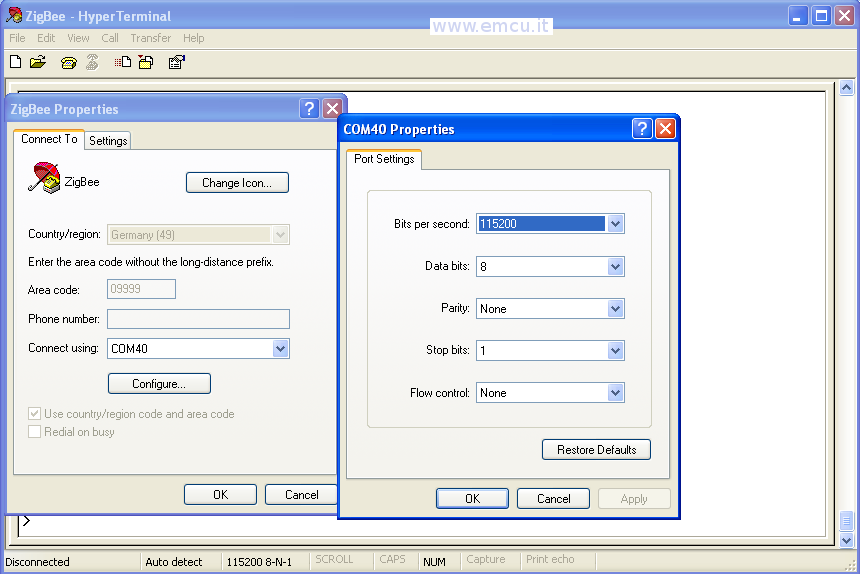
Open a Hyper Terminal : in Start menu go to Accessories-Communication and select Hyper Terminal.
Next select the corresponding COMx port from Connect using list at the bottom of the dialog.
In COM Properties dialog enter following properties:
– Bit rate: 115200
– Data bits: 8
– Parity: None
– Stop bits: 1
– Flow control: None

Connect the dongle by pressing on the telephone icon (see below).

Now type ? to get help (see below).

On SUN node (master) press f to create a network and at the question:
On PLANET node (slave) press j to join to a network and at the question:
Now you see the connection between SUN and PLANET node, see below.

Next select the corresponding COMx port from Connect using list at the bottom of the dialog.
In COM Properties dialog enter following properties:
– Bit rate: 115200
– Data bits: 8
– Parity: None
– Stop bits: 1
– Flow control: None

Connect the dongle by pressing on the telephone icon (see below).

Now type ? to get help (see below).
This image is related to SUN node.

This image is related to PLANET node.


On SUN node (master) press f to create a network and at the question:
SET MAGIC NUMBER
answer 0 (zero)
Magic number is used to distinguish to which network a device should join.
answer 0 (zero)
Magic number is used to distinguish to which network a device should join.
On PLANET node (slave) press j to join to a network and at the question:
SET MAGIC NUMBER
answer 0 (zero)
Magic number is used to distinguish to which network a device should join.
answer 0 (zero)
Magic number is used to distinguish to which network a device should join.
Now you see the connection between SUN and PLANET node, see below.

UP
Using Peryton SW for Sniffer the Network
Download the software for this example
Using Peryton SW for Sniffer the Network
If you use Peryton SW is possible Sniffer the ZigBee Network.
Download the free 30-day trial Peryton SW from: http://www.perytons.com/index.html and install it.
Download perytons.s37 on DiZiC dongle, use the same procedure used for SUN and PLANET node.
Now, from a PLANET node, type the command i for know the channel in use (see below, Channel: 17).

Start the Peryton SW and configure it as below.
ATTENTION: use yours channel number.
And click Start (Real-Time) for analyze your network.

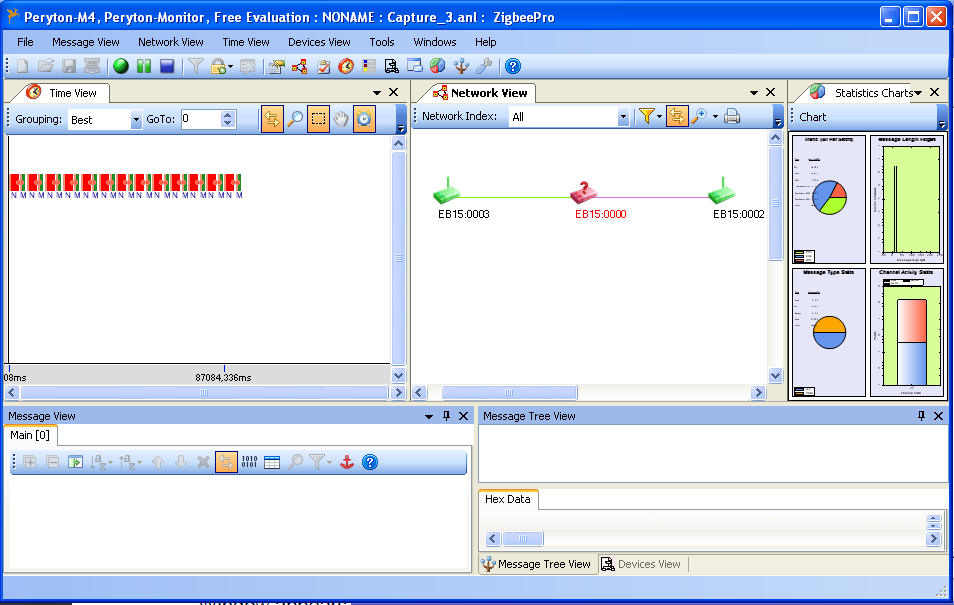
After some second you see your network.
In my case there are:

Download the free 30-day trial Peryton SW from: http://www.perytons.com/index.html and install it.
Download perytons.s37 on DiZiC dongle, use the same procedure used for SUN and PLANET node.
Now, from a PLANET node, type the command i for know the channel in use (see below, Channel: 17).

Start the Peryton SW and configure it as below.
ATTENTION: use yours channel number.
And click Start (Real-Time) for analyze your network.

After some second you see your network.
In my case there are:
EB15:0000 that is SUN node
EB15:0002 that is PLANET node
EB15:0003 that is PLANET node
EB15:0002 that is PLANET node
EB15:0003 that is PLANET node

Download the software for this example
If you want receive the SW for this demo (ZigBee-DiZiC-StarNetwork is 128Mbyte) please click here.
