

Home Page
Normally on Ubuntu and its
derivatives like XUbuntu, java is present but is a open source version
that not support all the features.
For this reason on some web internet site isn't possible run the java scripts.
For resolve this problem is necessary remove the java open source version and instal the java full version.
Remove java open source version
Go to ORACLE site and download the Java Virtual Machine in rpm format (flags the: accept for license agreement).
Convert RPM to DEB
Install DEB package
Now is necessary configure FIREFOX for to use JAVA VM.
For this reason on some web internet site isn't possible run the java scripts.
For resolve this problem is necessary remove the java open source version and instal the java full version.
Remove java open source version
From the terminal type: sudo apt-get
purge openjdk*
Go to ORACLE site and download the Java Virtual Machine in rpm format (flags the: accept for license agreement).
Choose the right version for your PC.
For example I have a Intel Pentium Dual Core (x86) and the right version is show below the red box.
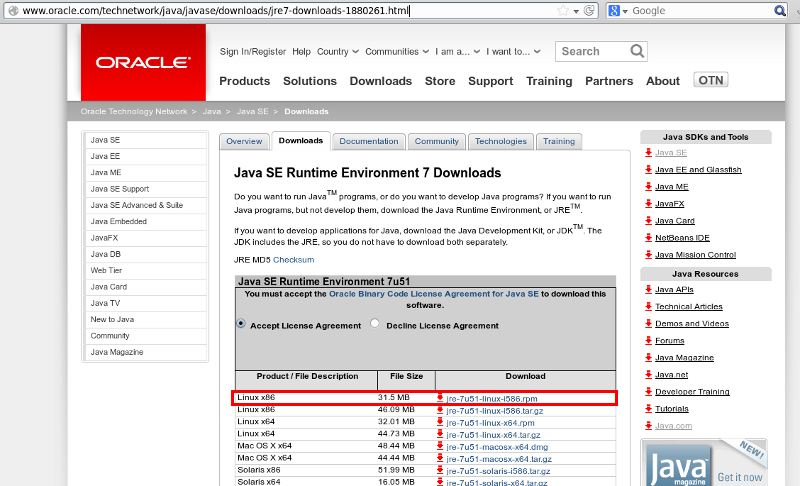
For example I have a Intel Pentium Dual Core (x86) and the right version is show below the red box.
Convert RPM to DEB
RPM format is not compatible with
Ubuntu so is necessary convert it in DEB format.
For do this is necessary use alien.
If alien is not present on your distribution install it by this command: sudo aptitude install alien
Now convert file from RPM to DEB, for do this use this command:
sudo alien jre-7u51-linux-i586.rpm
Of course change the name: jre-7u51-linux-i586.rpm, with the name of the package that you chose for your PC.
Install DEB package
Now you have a DEB package and for
install it, click twice on it.
At this point the PC open the Ubuntu Software Center and you follow the instructions that appear on your monitor.
At the end of the installation, for verify if java is installed correctly, use this command: java -version
You must see something like this:
At this point the PC open the Ubuntu Software Center and you follow the instructions that appear on your monitor.
At the end of the installation, for verify if java is installed correctly, use this command: java -version
You must see something like this:
enrico@enrico-MM061:~/PY$ java -version
java version "1.7.0_21"
Java(TM) SE Runtime Environment (build 1.7.0_21-b11)
Java HotSpot(TM) Client VM (build 23.21-b01, mixed mode)
enrico@enrico-MM061:~/PY$
java version "1.7.0_21"
Java(TM) SE Runtime Environment (build 1.7.0_21-b11)
Java HotSpot(TM) Client VM (build 23.21-b01, mixed mode)
enrico@enrico-MM061:~/PY$
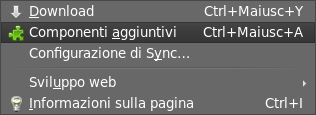
Now is necessary configure FIREFOX for to use JAVA VM.
Open FIREFOX and select: tools ->
add-ons components
See below
From the window that appear chose: Plugin
and make sure that JAVA PlugIn is active, see below.

For test if the java work correctly click here.
See below
From the window that appear chose: Plugin
and make sure that JAVA PlugIn is active, see below.
For test if the java work correctly click here.